 Javascript API 7.x
Getting started with BlomURBEX Web API
Introduction
This is a basic developer documentation to start creating a basic web app with BlomURBEX Web API. In this tutorial we will learn what is a workspace, how can layouts be used to arrange an array of viewers, and how to set up viewers for a first time. We will end with a web page with two viewers, a 2D map viewer and a street image viewer shown in a dual side-by-side page. Let's start.
Initial steps
Create a new empty directory for your project. It is a good practice to create three folders inside it:
cssfolder to store stylesheets,imgfolder to store images,jsfolder to store the BlomURBEX Web API file and also anapp.jsfile for the project code.
Inside the css folder copy the following files from the BlomURBEX Web API distribution content:
blomurbex.cssol.cssreset.css
The file blomurbex.css is the one with the BlomURBEX Web API stylesheet. The rest are the dependency stylesheets. We also need to add another dependency stylesheet for icons using Google Material, as we see later.
Inside the img folder copy the following files from the BlomURBEX Web API distribution content:
geolocation_marker.pngpanorama_fov.pngpanorama_fov_big.pngpanorama_fov_med.pngthrobber_13.gif
Inside the js folder copy the file with the BlomURBEX Web API:
bu.js
Application code and index.html
Place your application code in app.js inside the js folder. Here is a simple starting point:
var mapViewer, mapViewerControls;
var streetViewer, streetViewerControls;
var workspace;

bu.USERTOKEN = 'Set your own user token here';
Replace the string in the last line with your user token provided by Blom. For now this code is only a initial declaration of variables. We will fill the rest of this file later in the rest of this tutorial.
You will also need an index.html file. Place it at the root level in your project foldere. Here is a simple example:
<!DOCTYPE html>
<html>
  <head>
    <meta charset="utf-8">
    <title>BlomURBEX Web API basic sample</title>
    <link rel="stylesheet" type="text/css" href="./css/reset.css" />
    <link rel="stylesheet" href="https://fonts.googleapis.com/icon?family=Material+Icons" />
    <link rel="stylesheet" href="./css/ol.css" type="text/css" />
    <link rel="stylesheet" href="./css/blomurbex.css" type="text/css" />
    <script src="./js/bu.js"></script>
    <script src="./js/app.js"></script>
    <style>
      #container {
        width: 960px;
        height: 540px;
      }
    </style>
    <script type="text/javascript">
      document.addEventListener('DOMContentLoaded', initializeApp);
    </script>
  </head>
  <body>
    <div id="container"></div>
  </body>
</html>
Workspaces and viewers
A workspace is a collection of set-up rules to configure the way several viewers are initiated and are related together. It is possible to use it for initialize only one viewer, or several.
Let´s start doing the most basic set up initializing a workspace with only one 2D viewer.
Modify the app.js to have now this code:
var mapViewer, mapViewerControls;
var streetViewer, streetViewerControls;
var workspace;

bu.USERTOKEN = 'Set your own user token here';

function initializeApp() {
    document.removeEventListener('DOMContentLoaded', initializeApp);

    mapViewerControls = [
        bu.controldef.noAction(new bu.control.StatusBar({
            controls: [
                bu.ortho.controldef.ViewerInfo(),
                bu.ortho.controldef.ScaleLine()
            ]
        })),
        bu.ortho.controldef.Zoom(),
        bu.controldef.Attribution()
    ];

    mapViewer = new bu.ortho.Viewer({
        center: [10.743704, 59.911299],
        resolution: 2.38,
        layers: [
            new ol.layer.Tile({
                name: 'BlomURBEX WMTS',
                baselayer: true,
                source: new bu.ortho.source.WMTS({
                    layer: bu.BlomURBEXBaseLayer.ORTHO,
                    autoSwitchLayer: true
                })
            })
        ],
        controls: [],
        usePanoramas: true,
        useAnimations: true
    });

    workspace = new bu.Workspace({
        layout: {
            name: 'Map & Street layout',
            views: [
                {
                    column: 0,
                    viewer: mapViewer,
                    controls: mapViewerControls
                }
            ]
        },
        target: 'container'
    });
}
Try the code uploading it to a web server you have up and running and then accessing through index.html through your browser.
You will be see one viewer, showing 2D imagery centered at Oslo, with a few basic controls.
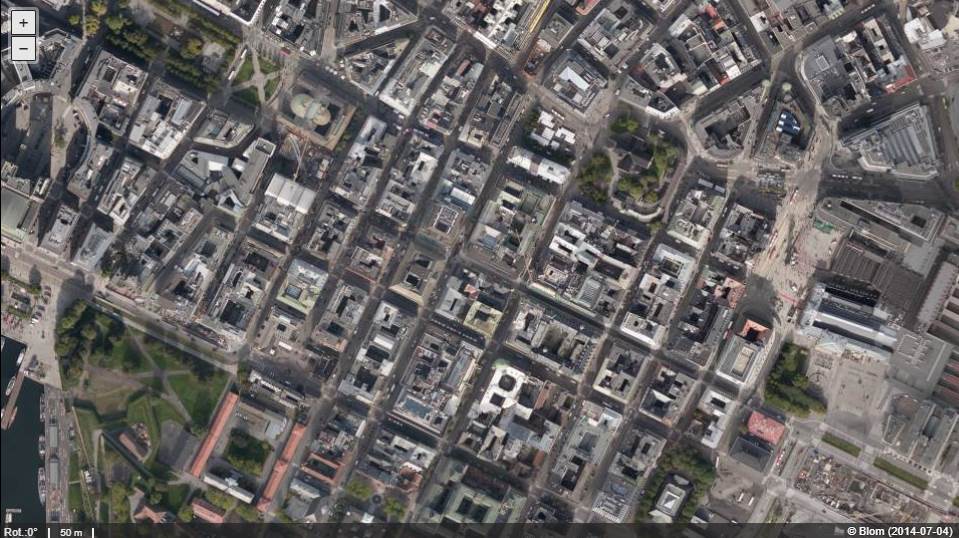
This basic app has some functionality already done. You can pan (by dragging), zoom (with the mouse wheel), and rotate the view (by Ctrl + dragging). As you move the mouse you will se the coordinates in the sttus bar, and the map rotation, scale and dates of the visible imagery is also shown there. Finally, another visible control to jump through zoom levels is added to the viewer.
Let's explain how this works.
A workspace is contained of one or several viewers. The collection of viewers can be passed to the workspace constructor using a bu.WorkspaceOptions object. This object has this definition:
/**
 * Options for bu.Workspace.
 * @typedef {Object}
 * @property {(bu.Layout|undefined)} layout - The initial layout for the workspace.
 * @property {(Array.<bu.ControlDefinition>|undefined)} controls - An array of control definitions that will be added to the workspace, not attached to any viewer.
 * @property {(Element|string|undefined)} target - The DOM target element where this workspace will be appended.
 * @api
 */
bu.WorkspaceOptions;
It has three optional properties: layout, to define the collection of viewers and their arrangement; controls, to define a collection of controls not attached to any viewer; and target, to define the HTML element where the workspace will be rendered.
The layout is defined using a bu.Layout object. The definition of this object is this:
/**
 * A collection of bu.LayoutView with a name.
 * @typedef {Object}
 * @property {(string|undefined)} name - The name of the layout.
 * @property {(Array.<bu.LayoutView>|undefined)} views - The array of views of the
 * layout.
 * @api
 */
bu.Layout;
It only has two optional properties: name, to give a name to the layout (useful if you need in the future to change between different layouts); and views, that define the collection of viewers, and their arrangement. This collection is an array of bu.LayoutView objects.
A bu.LayoutView object has this definition:
/**
 * Each of the views that compose a bu.Layout column is the column in which the view lays. If two views must be in the same column then the value is the same.
 * @typedef {Object}
 * @property {number} column - The column for the view. First column is zero.
 * @property {bu.Viewer} viewer - The viewer for the view.
 * @property {(Array.<bu.ControlDefinition>|undefined)} controls - An optional array of bu.ControlDefinition that will be attached to the viewer.
 * @property {(Array.<bu.SyncProperties>|undefined)} syncOptions - An optional array of bu.SyncProperties with the syncing properties of the current viewer with respect to other viewers.
 * @api
 */
bu.LayoutView;
This object has two required properties: column with the column index (starting at zero) where the viewer will be added; and viewer with the viewer object. Optionally, you can define a collection of controls for the viewer and if there are several viewers, a syncing properties between them.
Now check again out previous code and notice that we have created a valid bu.Layout object named "Map & Street layout" and with only one valid bu.LayoutView object. This is defined to be in a first column (column: 0) and will contain a 2D viewer (bu.ortho.Viewer).
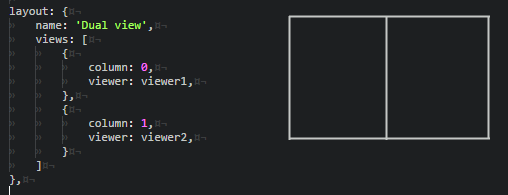
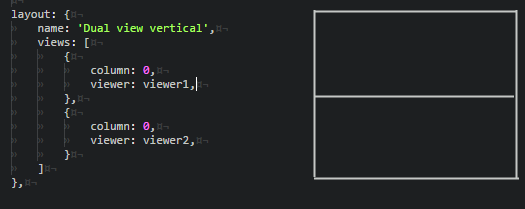
The layout system is pretty straightforward. Each viewer is added to a column, and if several viewers share the same column, they are stacked below the previous one in a vertical stack. For example, to create a dual view with two viewers in horizontal layout, you should use this:
For a dual view with two viewers in vertical layout, you should use this:
A triple view could be defined as:
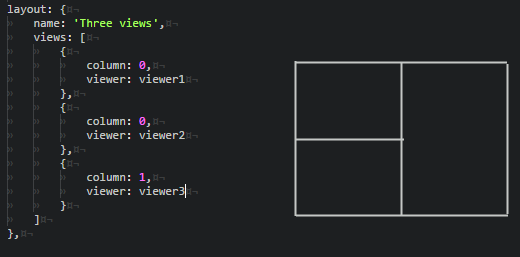
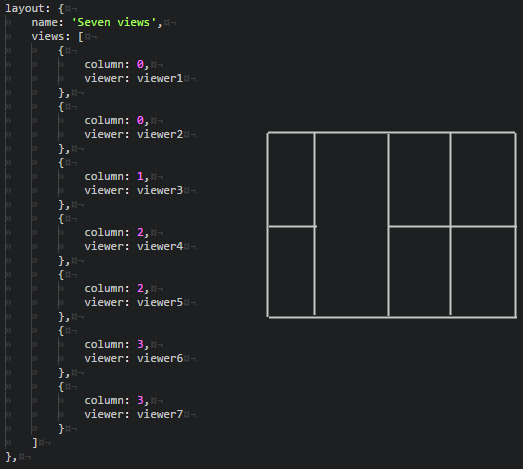
This system has some limitations but the number of different layouts is quite a lot just setting a column index for each viewer. For example, consider this complex layout:
Setting up a dual viewer
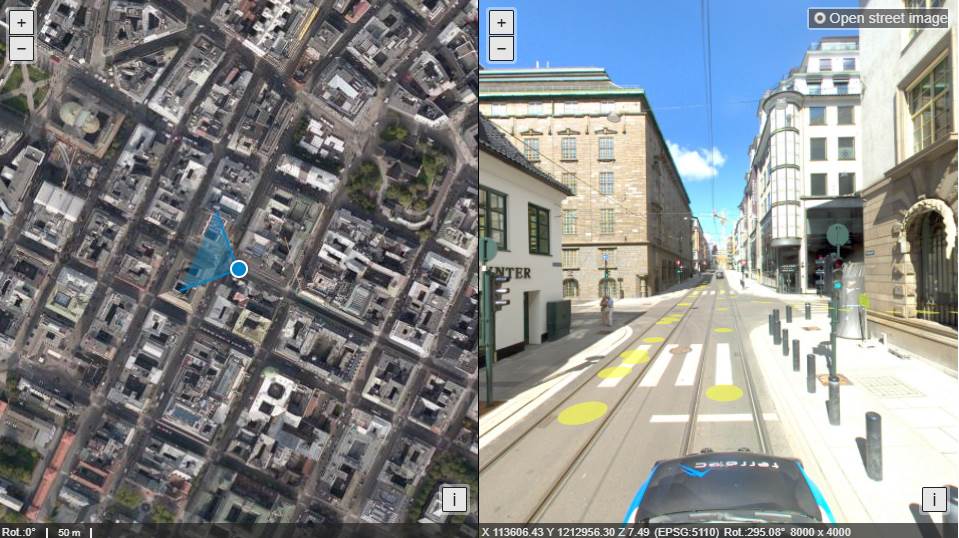
Now we know how to use workspaces and layouts, let's end our example with a dual viewer showing both a 2D and a street viewer side-by-side, and also define some syncing properties. Please uptate the index.html and app.js as follows:
<!DOCTYPE html>
<html>
  <head>
    <meta charset="utf-8">
    <title>BlomURBEX Web API basic sample</title>
    <link rel="stylesheet" type="text/css" href="./css/reset.css" />
    <link rel="stylesheet" href="https://fonts.googleapis.com/icon?family=Material+Icons" />
    <link rel="stylesheet" href="./css/ol.css" type="text/css" />
    <link rel="stylesheet" href="./css/blomurbex.css" type="text/css" />
    <script src="./js/bu.js"></script>
    <script src="./js/app.js"></script>
    <style>
      #container {
        width: 960px;
        height: 540px;
      }
      .bu-attribution {
        bottom: 1.5em;
      }
      .bu-switcher-openstreetimage {
        top: .5em;
        right: .5em;
      }
    </style>
    <script type="text/javascript">
      document.addEventListener('DOMContentLoaded', initializeApp);
    </script>
  </head>
  <body>
    <div id="container"></div>
  </body>
</html>
The changes in the index.html are to position the controls in a better place than default.
var mapViewer, mapViewerControls;
var streetViewer, streetViewerControls;
var workspace;

bu.USERTOKEN = 'Set your own user token here';

function initializeApp() {
    document.removeEventListener('DOMContentLoaded', initializeApp);

    mapViewerControls = [
        bu.controldef.noAction(new bu.control.StatusBar({
            controls: [
                bu.ortho.controldef.ViewerInfo(),
                bu.ortho.controldef.ScaleLine()
            ]
        })),
        bu.ortho.controldef.Zoom(),
        bu.controldef.Attribution({collapsible: true})
    ];

    mapViewer = new bu.ortho.Viewer({
        center: [10.743704, 59.911299],
        resolution: 2.38,
        layers: [
            new ol.layer.Tile({
                name: 'BlomURBEX WMTS',
                baselayer: true,
                source: new bu.ortho.source.WMTS({
                    layer: bu.BlomURBEXBaseLayer.ORTHO,
                    autoSwitchLayer: true
                })
            })
        ],
        controls: [],
        usePanoramas: true,
        useAnimations: true
    });

    streetViewerControls = [
        bu.street.controldef.OpenStreetImageSwitcher(),
        bu.controldef.noAction(new bu.control.StatusBar({
            controls: [
                bu.street.controldef.ViewerInfo()
            ]
        })),
        bu.street.controldef.Zoom(),
        bu.controldef.Attribution({collapsible: true}),
        bu.controldef.ProgressLabel()
    ];

    streetViewer = new bu.street.Viewer({
        center: [10.743704, 59.911299]
    });

    workspace = new bu.Workspace({
        layout: {
            name: 'Map & Street layout',
            views: [
                {
                    column: 0,
                    viewer: mapViewer,
                    controls: mapViewerControls
                },
                {
                    column: 1,
                    viewer: streetViewer,
                    controls: streetViewerControls,
                    syncOptions: [
                        {
                            syncedViewIndex: 0,
                            syncCenter: true,
                            syncFOV: true
                        }
                    ]
                }
            ]
        },
        target: 'container'
    });
}
Some new elements we have added here:
- We have define a new
bu.street.Viewerand an array ofbu.ControlDefinitionobjects for it. - Notice that we have added the viewer as a new
bu.LayoutViewobject in the options of the workspace and we have set it to a new column in the layout. - Notice that we have modify the default set up of one control, the one generated by static function
bu.controldef.Attribution. This function, as all the functions in the namespacebu.controldef, instantiates abu.ControlDefinitionusually using two optional params, the first the options for the control, and the second for one action that will be added to the array of actions that anybu.ControlDefinitionhas. We have defined the propertycollapsibleas true, so now by default the control is collapsed in a button. - We have added a tool to the street viewer. A tool is a type of control that has two states (activated or deactivated), and once activated, triggers some actions in the viewer when this is interacted. The tool we have added (created through
bu.street.controldef.OpenStreetImageSwitcherallows to click on point at ground level and load the nearest street image to the clicked point. - Finally we have added some syncing options to the street viewer. For that we need to pass a
bu.SyncPropertiesobject to thebu.LayoutView. This object has asyncedViewIndexto reference the viewer that will be synced (the one in the array of viewers with the index given), and several properties that modify the behaviour when a sync in executed. In this case, usingsyncCenterthe 2D viewer will update its center each time the street viewer changes (and not viceversa), and also usingsyncFOVeach time the street viewer changes its FOV (field of View) the 2D will update an icon.